
Discuss this article on the forums
I arrived at The University of the Pacific for day one of my cardiopulmonary exercise stress test . The team that would be working with me on the test consisted of Staci Stevens, the founding executive director, Jared Stevens, the clinical coordinator and a volunteer MD. Introductions were made, I provided the last of the required paperwork, as well as old copies of EKGs and Holter Monitor results. Finally, Staci walked me through what would take place over the 2 days.
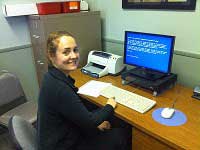 The first stage was to go into a quiet office with a closed door and take the CalCap reaction time test. This test is taken at the very beginning of day one before any exertion to get a baseline of my normal reaction time, and then at the end of day two to evaluate the change in reaction post-exertion. You sit at a computer and are supposed to hit the spacebar per the instructions. There are 3 tests, each with a practice round. The screen is electric blue, with a white outline of a box in the middle. Round one, you press the spacebar anytime a number appears in the box. Round two, you press the spacebar when two of the same numbers appear in a row. Round three, you press the spacebar when a number is followed by the next number in increasing order (1-2; 4-5; 7-8). It was finished in 15 minutes, at most.
Next we moved into the exercise test room, where we’d spend the majority of our time. It started with the doctor listening to my heart, taking a resting heart rate and my blood pressure. Then, onto the Spirometry test. I have taken this test many times before. I’m sure many of you have as well. As a kid when they thought I had asthma, and more recently when I was in the hospital due to collapse when they still couldn’t diagnose my CFS or Lyme. The test is simple. You block off all air to your nose, and wrap your lips around a white tube that has wires connected to a computer for capturing results. When the doctor says go, you breathe in as much air as you can, and then you blow it out into the tube as hard as you can. You continue blowing even when it seems like you have no air left, until the doctor says stop.
 The Spirometer is used to measure abnormal lung function, most commonly used as a barometer for patients being treated for lung disease or asthma. The spirometer provides your forced vital capacity (FVC), measuring the maximum volume of air you can exhale in liters over time in seconds. My memory escapes me on this one test, but I believe the Flow Volume Loop reading was also captured with this same tool. The flow-volume loop reports airflow displays in liters over time in seconds like the Spirometer. However this is reported in relation to lung volume in liters during complete exhalation and maximum inhalation. To see a visual of how this is measured, and depending on the type of patient, visit HERE.
Next was the Maximum Voluntary Ventilation (MVV), a measurement of the maximum air that can be inhaled and exhaled within one minute. This test was similar to the original spirometer test in that I would be breathing into and out of the white tube. However instead of one big inhale and exhale, I had to repeat for a full minute. It is almost like forcing yourself to hyperventilate. They warned me I might be dizzy by the end, and after each try (we did three) I would have to rest with my head between my legs.
 The Nasal Acoustic Rhinometry test followed. It was an odd test, I’ve never had before. The edge of a plastic tube is held up to the edge of each nostril, and then this tool provides its analysis based on sound waves reflected from the nasal cavities. It measures air pressure and the rate of airflow in the nasal airway during respiration. These measurements are used to calculate nasal airway resistance. This test was done before and after exercise day one and day two.
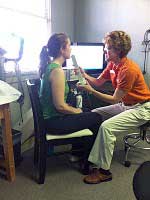
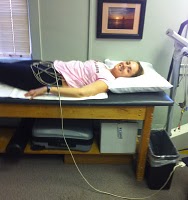 Out of the chair and onto the table. It was time for my initial resting EKG. Stickies connected to wires were “plugged in” all over my abdomen and chest. I was told to rest calmly on the table, and the resting EKG was taken. All the cords would stay on me for bike portion of the test.
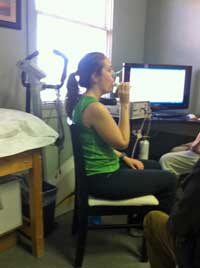
I was given a pack for all the wires to belt around my waste. It was very similar to when I wore a pack for my 24 hour Holter Monitor. The face mask was fitted, my temperature was taken. It was time to hit the bike!
Now this is when the actual Cardio Stress Test performed happens. Traditionally, it is done either on a bike or a treadmill. A few years ago I had a single-day cardio stress test. It was on a treadmill, at University of California – San Francisco. I had to stop it earlier than expected because I was passing out on the machine, not exactly safe on a treadmill. The entire staff involved (four people) was in a frenzy while I took the test. They could see I was sick and so extremely weak, yet the report came back that I was “normal.” Go figure.
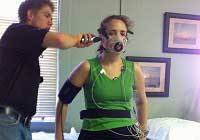
The University of the Pacific chooses to use a stationary bike only. They feel it’s safest for the participant. As I move from the exam table to the bike, just having finished my EKG, I have all the wires attached to my abdomen and fed through one box attacked at my waist. I also have a blood pressure cuff affixed to my right arm, a mask on my face that measures oxygen in and carbon dioxide out and a pulse oximeter on my pointer finger. The pulse ox reads the oxygen saturation levels with exercise, also known as a pulse ox or pulse oxygenation.
As a side bar, I’ve always felt the pulse ox is a very telling biomarker for CFS. It was one of the first and only diagnostics that was ever picked up by my GP. She didn’t know what to do with it, but she knew it was wrong. If you have never investigated this, I highly recommend a quick test. Most home nurses and doctors offices have a pulse oximeter. Just sitting it should read 98/99. Mine always does. But then walk one flight of stairs. Ask your doctor or nurse to come along. After a flight of stairs, taking them extremely slow with my doctor holding my arm, my pulse ox dropped to 84. If you’re in the hospital with that kind of reading, they give you oxygen. Up until 4 months ago, it was still 84-86 when I’d do the test with my home nurse (she’d come in to dress my PICC line, and was nice enough to humor me). But recently, it has normalized in my at home tests, maybe due to my new POTS meds. I don’t have my pulse ox readings (yet) from University of the Pacific, but when asking Staci if she noticed them “off” during exertion she said there was nothing glaring.
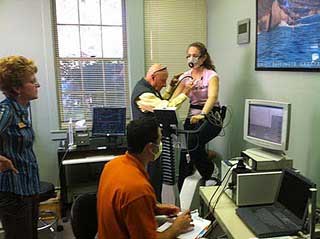 OK, back to the bike. Before we do anything, my heart rate is checked by the doctor and my blood pressure is taken. The team is sitting at a desk with a multiple computers providing all the readings – the EKG cords plugged into me, the pulse ox monitor on my finger, the oxygen/carbon dioxide readings captured by he mask, the speed of the bike, the watts used and the resistance on the bike.
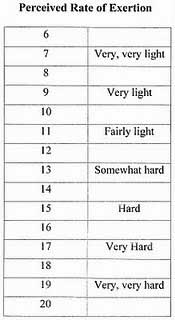
Next the team introduces me to the bike features. There is a watts meter. That shows my exertion. There is a resistance that will slowly creep up in increments of 5. They will be managing (i.e. increasing regularly) that from the computer. And there is a speed-like setting (I forget the actual term) which I’m supposed to keep between 50-60. Taped to the bike, there is also a Perceived Rate of Exertion(PRE) chart. I will be relaying what I think my rate of exertion is thoughout the test.
 For 3 minutes I’m to sit on the bike, but not do anything. They test my stats one more time. I note that my PRE has already increased since sitting down. I don’t do well having my feet down and still. I can feel blood pooling in my feet, and my exertion increasing to just sit and hold myself up on the bike. Now it’s time to start the test.
I begin cycling, getting my “speed” up to 50. And I’ll admit right now, it never got much higher than that. My perceived rate of exertion edges up another 10. They let me cycle for a few minutes without resistance and then take my blood pressure. Next they begin to slowly introduce resistance. I’d say I was on the test for about 12 minutes. They checked my BP every 3 minutes, increased the resistance by 5 every minute, requested my PRE every minute.
We stopped the test when I could no longer pedal, coincidentially just as I reached 20 PRE. I was able to produce 104 watts, which everyone seemed extremely satisfied with… if you’ll remember, one requirement of this test is that the patient provides “ability and willingness to provide an excellent effort.” I’d like to note that I could no longer keep cycling due to my legs’ inability to pedal. That simple. I found that interesting, as I would have assumed it would have been my “cardio strength” to give in (burning lungs, etc). It was odd to me that my quads, the ones that not too long ago were solid runner’s legs, failed me. As demented as it may sound, and even though I knew I’d pay for it later, I loved every second of this test. I have always been an athlete. Not a medal winning athlete, but someone who loves the burn in the lungs and the flush on my face. It was a few minutes of my old life I got back, in the safe confines of the Fatigue Lab.
Once the stress test was over, they repeated the Nasal Acoustic Rhinometry test while I was still on the bike. Then I was brought back to the table. I was told to lay down and rest. My stats were continued to be taken until I was back to resting heart rate and normal blood pressure.
The whole thing took about two hours. I came back day two for the same process. Only difference was the CalCap reaction time was taken at the end of the day, I found myself closer to the fetal position when laying down after the day two’s test, and an initial evaluation was provided. I’ll report on those results in Part 3.
On a lighter note, I thought I’d share this for Staci and her team’s benefit. I might have complained just a few times that the bike seat was a little hard on this couch potato’s behind. Just look at what you’re missing, having the test on a bike instead of a treadmill: CLICK HERE Here It Goes Again by OK Go. (Unfortunately, this video is not allowed to be embeded so you must click through to YouTube.)